 My wife is a BIG Fan of Tilapia and an even BIGGER Fan of me doing the cooking on the grill.
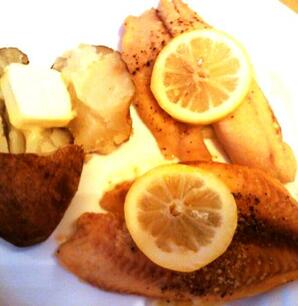
One of the things that I found out about grilling Tilapia is that you lose most of the flavors that you add to the Tilapia through the grill grate. So, I came up with this idea of putting the Tilapia in a pouch to keep all of the flavors together and it saves time by not really needing to either marinate or brine the Tilapia. Grilling basically steams the Tilapia and infuses all of the great flavors that we like into the fish. You keep the flavors with the Tilapia as it cooks and when you turn the fish over in the pouch you avoid having to scrape the fish off of the grill grates (even if you oil them like I do). When you take that pouch off of the grill and open it, those flavors kick your taste buds into high gear and you are in store for a wonderful Tilapia meal. Here is what you will need to make my Grilled Tilapia in a Pouch: 3 whole Tilapia – cleaned (OR 6 cleaned Tilapia fillets) 1 medium Vidalia or red onion 1 or 2 Large Lemons or Lemon Juice 6 to 8 cloves garlic, crushed Olive Oil Cayenne Pepper Kosher Sea Salt and Fresh Ground Black Pepper 6 aluminum sheets, approximately 14 by 14 inches Heat grill to medium-high heat. Rinse Tilapia and pat dry including the cavity if you’re grilling it whole. Slice onion into six or eight 1/8-inch rings, and set aside. If using a whole Lemon then slice lemon also into six or eight 1/8-inch rings, remove seeds and set aside then squeeze the Juice from the remaining lemons and set that aside as well. Rub Olive Oil generously all over the Tilapia, including a generous amount in the cavity. Rub 1 clove of crushed garlic over the Tilapia and inside the cavity. Place 1 whole Tilapia (or 2 fillets) in the center of the aluminum foil then season the outside and inside (or both sides of the fillets) with Salt and Ground Pepper to taste. A Light sprinkle of Cayenne Pepper will kick it up a notch. Place Onion, a crushed Garlic clove and a couple of Lemon Slices (or Lemon Juice) inside the cavity or between the fillets. Drizzle the outside of the Tilapia generously with remaining Lemon Juice. Fold aluminum foil around fish to create a sealed package. Repeat for each Tilapia. How long you grill the Tilapia will depend on how big the Tilapia or fillets are. Place packets on hot 350 degree grill for 5 to 6 minutes on each side turning the packets over one or two times during the grilling. If using Fillets then only cook for 3 to 4 minutes on each side. Remove fish from foil and serve immediately. Note: To add another dimension of flavor to the Tilapia, place a pat of butter in the cavity before folding in the aluminum foil.
1 Comment
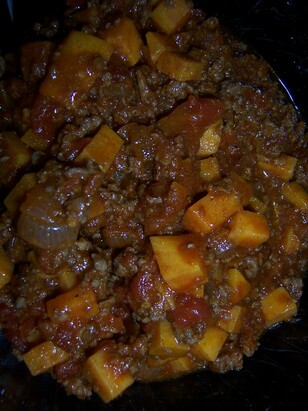 This is a new chili recipe that I wanted to make for the Paleo Friendly diet that is surprisingly very tasty and also very filling too! We have enjoyed it over a dozen times and I’ve shared it with at least four of my extended family members, as well.
Servings: 6 You’ll need: 2 lbs. 93% lean ground beef 3 Tbsp. chili powder 3 Tbsp. ground cumin 1 heaping tsp. garlic (minced) 1 small sweet onion (minced) 1 Tbsp. coconut oil 6 oz can tomato paste 12 oz. can of beer 1 10 oz. can of mild diced tomatoes with green chilies 2 sweet potatoes (peeled and diced into bite sized pieces) Fresh ground black pepper Fresh ground sea salt 1 pitted, peeled and sliced avocado (optional) Hot sauce (optional) In a large Dutch oven, sauté onions and garlic in coconut oil, until the onions begin to become transparent. Add in beef, a few turns of fresh ground sea salt and fresh ground black pepper to onions and garlic mixture. Stir constantly browning meat mixture thoroughly. Drain liquid fat (if any) off in a large footed self-standing strainer in the sink. Pour meat mixture back into dutch oven and stir in 1-1/2 tsp. chili powder and 1-1/2 tsp. ground cumin and mix thoroughly. Next, stir in tomato paste, then rinse out the sides of the tomato paste can at least three times with the entire can of beer, while pouring the beer in be sure to continue to stir the cooked meat mixture. Stir in the diced tomatoes with green chilies, diced sweet potatoes and mix thoroughly. Stir in the remainder 1-1/2 tsp. chili powder and 1-1/2 tsp. ground cumin and let simmer on low heat, covered with lid, for 40 to 45 minutes. Stir chili about every 10-15 minutes. Here you can add just a little more fresh ground black pepper or fresh ground sea salt to your desired taste. Serving Suggestion: Serve topped with your favorite hot sauce (if any) and (optional) avocado slices. Karen’s Note: To make this chili even spicier you can top it with your favorite hot sauce. My hubby, Frank, uses his favorite Habanero sauce that he made with fresh picked Habaneros that I grew in my garden last summer. but even tho they are flavorful, they are also very hot! You can use one can of diced tomatoes and one can of green chilies instead of a can of diced tomatoes with green chilies if you want to for this awesome Sweet Potato Chili…Enjoy and keep warm this winter, especially if you have been caught up in the #Blizzard2016! 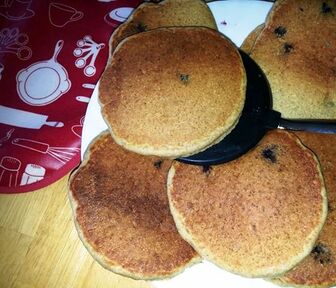 Approx. 8 servings (15-16 medium size pancakes)
You’ll need: 2 cups Aunt Jemima* Whole Wheat Blend Pancake mix 2 cups fat free milk 2 large eggs 1 Tbsp. canola oil 1/2 cup unsweetened applesauce 2 tsp. imitation vanilla extract 1/4 fresh blueberries, or frozen thawed 1/4 cup chopped English walnuts To make the pancakes, in a large bowl combine by whisking together well or beating on medium-low speed with a mixer the whole wheat blend pancake mix, milk, eggs, oil, applesauce and vanilla. Using a long spoon or spatula, slowly add and hand stir in the blueberries and walnuts, blending each well. Let batter rest for 5 minutes and preheat a non-stick flat griddle to 375°F. Pour 1/4 cup of batter onto a non-stick griddle (heated to 375°F) or a large non-stick flat frying pan and cook over medium heat. Cook until the edges of the pancakes are dry and small bubbles have formed on top, approximately 1-2 minutes; then flip with a spatula. Transfer to a 250°F oven to keep warm while repeating the procedure with the remaining batter. Karen’s Note: Serve with both lite or sugar-free syrups. Butter or butter spray is optional, but not necessary for these very sweet and healthy pancakes! *For More Aunt Jemima Pancake Preparation Tips or Recipes, go to: AuntJemima.com |
Karen VerduscoAlways reinventing myself by creating new recipes or craft ideas. All photos are genuine. Please send me an email or recipe you liked or tried. Categories
All
Archives
June 2017
|
-
Products
- Belts >
-
Billfolds, Clutches and Wallets
>
- Leather Clutch / Wallet
- Ostrich Leather Clutch Wallet
- Biker Long Leather Wallet
- Large Leather Billfold
- Slim Credit Card Wallet
- Slim Debit Wallet
- Deluxe Leather Roper Wallet
- Leather Biker Wallet
- Leather Billfolds
- Minimalist Leather Credit Card Wallet
- Deluxe+ Leather Roper Clutch/Wallet
- Leather Roper Wallet
- Bolo Tie
- Book Cover
- Business Card Holders
- Can Koozies with Handles
- Coin Pouches >
- Cosplay Leather Pouches
- Handbags and Purses >
- Java Jackets
- Knife Sheaths >
- Leather Jewelry >
- Luggage Tags
- Motorcycle Leather >
- Phone Holster
- Picture Frames >
- Remote Control Caddy
- Rodeo Buckles
- Strap Handles
- Tool Pouches
- Valet Tray
- Watch Band
- Wedding Guest Book
- Leather Blog
- Recipes
 RSS Feed