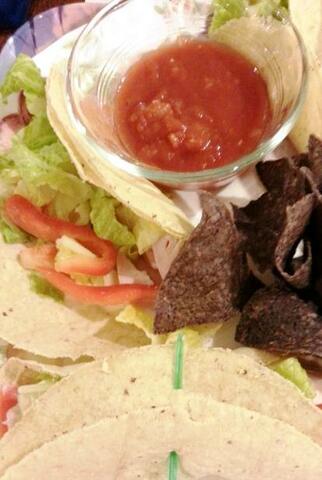
 Too hot to cook? Make these Easy Summertime Chicken Tacos for something quick to make and cooler to eat!
Servings*: 2 soft corn tacos per person You’ll need: 8 thin corn tortillas, fresh or thawed 8 oz. grilled chicken breast strips “bite-size” 1 small bunch green onions, sliced 1/4 small red pepper, sliced thin and chopped into 1 inch pieces 1 cup shredded romaine lettuce 2 Tbsp. light soft cream cheese 2 Tbsp. light sour cream 1/2 tsp. taco seasoning 1/2 cup salsa for serving on the side For Mexican Spread: In a small bowl, using a small whisk, mix together thoroughly the Soft Cream Cheese, Sour Cream and taco seasoning. On a plate assemble the Chicken Soft Tacos: Using a silicone spatula carefully cover 1-1/2 tsp. of Mexican Spread on each corn tortilla. Put 2 corn tortillas together by layering with spread on one side and not on the other side. There should be Mexican Spread in between the corn tortilla layers and on top, but no spread on the bottom of the soft taco. Next, top with pre-cooked “bite-size” chicken breast meat, red pepper pieces and shredded lettuce. Then top with a sprinkle or two of chopped green onion. Roll and thread with a toothpick or two. I used a plastic cocktail sword. Repeat the above process for the other 3 Chicken Soft Tacos. Karen’s Serving Suggestion: Serve immediately with 6-7 baked blue corn tortilla chips and a 1/4 cup side of salsa on one plate to share or 2 separate serving plates. A couple of sliced lime wedges can be put on plates for a hint-of-lime. Also, a 1/4 cup serving of fresh sliced chilled strawberries, watermelon or applesauce can be served with these Easy Summertime Chicken Tacos, but not absolutely necessary. *Servings can be increased up to 6 for a 2 dozen package of fresh or thawed thin corn tortillas.
0 Comments
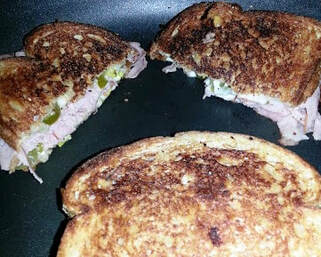 Servings: 3 (Note: This sandwich recipe can be doubled if necessary.)
You’ll need: 6 slices of Multi-grain Bread 6 slices of 2% Milk Monterrey Jack or Pepper-jack Cheese Sliced Dill Pickles or Slices of Tamed Jalapenos (drained) 95% Lean Deli Sliced Smoked Ham or Turkey (about 6-12 ozs.) 12 sprays (per 1 side of each slice of bread) of I Can’t Believe It’s Not Butter! Extra Virgin Olive Oil – Spray 2 Tbsp Extra Virgin Olive Oil (optional for non-stick and added browning) 12 thin slices of Avocado (optional) Heat a non-stick flat griddle, a large non-stick skillet or non-stick Panini maker to medium-high heat. Add two slices of multi-grain bread. Spray each side of bread with the I Can’t Believe It’s Not Butter EVOO spray and using a silicone brush spread about 1 tsp. of (optional) Extra Virgin Olive Oil on the side of bread slice that is facing up. Next, turn over slices of bread in 1-2 minutes, which is about the time it takes to add the non-butter EVOO spray and (optional) Extra Virgin Olive Oil. Add 1 slice of 2% milk cheese slice to each heated side of bread. Layer each bread slice with up to 6 pickles or jalapenos in the center of cheese slice. Then add 1-2 ounces of lean smoked ham or turkey. Carefully flip one side of sandwich on top of the other side. Press down firmly with a wide cooking spatula, making sure that the bread is browning evenly. If the heat is too high, turn it down to medium. If the bread is not turning a caramelized brown, then turn heat up to almost high, but turning the heat down is usually the case here. The cheese should be melting, but not “burning”. Lift up slightly to see if the bottom is browned…about 2-3 minutes and flip to brown the other side of the Grilled Cheese Sandwich, making sure to press down firmly. This helps the cheese melt into the sandwich and keep the pickles or jalapenos inside the melted Grilled Cheese Sandwich. Serve as a full Grilled Cheese Sandwich or cut in half or quartered on a dinner plate. A side of kettle chips, or sliced raw or steamed veggies is a nice touch. Perhaps serve with (optional) sliced Avocados, tooth-picked to the top of each half or quarter of the Grilled Cheese Sandwich, but any creamy, hot cup or any small bowl of soup on the side, which is really enjoyed during the chilly winter and early spring months and always goes good with this Grilled Cheese Sandwich…Enjoy! ~ Karen Verdusco Karen’s Note: This is not a low fat or low sodium recipe, but I’ve lowered the “bad fats” – by using 2% milk cheese slices and omitting the butter and lowered the sodium, as well, to give the Sandwich Maker the option to increase the Omega 3’s – “good fats” – by adding the EVOO non-buttery spray, Extra Virgin Olive Oil and Avocado Slices to this recipe. I consider any switch of sodium and “bad fats” to be included in my Heart Healthy Cooking and Eating Tips.  Servings: 3-6
You’ll need: 2 cans tuna in water, thoroughly drained 1/4 cup Miracle Whip Light 1/4 cup sweet relish 1/4 cup chopped water chestnuts from 1/2 of canned, drained first 2 tsp. yellow mustard 1 tsp. paprika 1 tsp. garlic powder 1/2 tsp. onion powder 1 pinch Cayenne powder 6 slices whole wheat bread 3 Roma tomatoes, cored In a medium mixing bowl, thoroughly mix the first nine items, until well blended and set aside. Slice Roma tomatoes into halves and using a paring knife cut out inside, leaving the outside edges (making little bowls) and set aside. Dice the leftover Roma tomato “insides”. Using a spatula, top 3 slices of whole wheat bread with tuna, until about half is left in the bowl. Then put the diced Roma tomato “insides” on tuna and cover with the remaining slices of bread. Leave tuna sandwiches whole for 3 servings or slice into halves for six, either diagonally or cut-across. Next fill the Roma tomato “bowls” with the remaining tuna salad and serve with sandwiches . Serve with carrots and or celery. Enjoy! Karen’s Note: For added flavor – add a little bit more garlic powder, onion powder and for more spice add more Cayenne (sparingly) and paprika for more sweetness. |
Karen VerduscoAlways reinventing myself by creating new recipes or craft ideas. All photos are genuine. Please send me an email or recipe you liked or tried. Categories
All
Archives
June 2017
|
-
Products
- Belts >
-
Billfolds, Clutches and Wallets
>
- Leather Clutch / Wallet
- Ostrich Leather Clutch Wallet
- Biker Long Leather Wallet
- Large Leather Billfold
- Slim Credit Card Wallet
- Slim Debit Wallet
- Deluxe Leather Roper Wallet
- Leather Biker Wallet
- Leather Billfolds
- Minimalist Leather Credit Card Wallet
- Deluxe+ Leather Roper Clutch/Wallet
- Leather Roper Wallet
- Bolo Tie
- Book Cover
- Business Card Holders
- Can Koozies with Handles
- Coin Pouches >
- Cosplay Leather Pouches
- Handbags and Purses >
- Java Jackets
- Knife Sheaths >
- Leather Jewelry >
- Luggage Tags
- Motorcycle Leather >
- Phone Holster
- Picture Frames >
- Remote Control Caddy
- Rodeo Buckles
- Strap Handles
- Tool Pouches
- Valet Tray
- Watch Band
- Wedding Guest Book
- Leather Blog
- Recipes
 RSS Feed