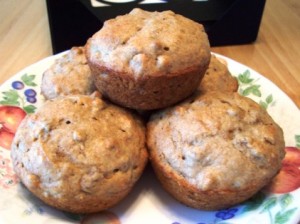
 Here’s How to Bake Moist and Delicious Banana Nut Bread (or Moist and Delicious Banana Nut Muffins-pictured) 18 Servings You’ll need: 1⁄2 cup canola oil 1 cup sugar 1 teaspoon vanilla extract 2 large eggs (beaten) 3 medium ripe bananas, mashed (about 1 cup) 1⁄4 cup low fat milk 2 cups all purpose flour 1⁄2 teaspoon salt 1⁄2 teaspoon baking soda 1 cup chopped English walnuts Directions: Using an electric or hand mixer; cream together in a medium bowl the canola oil and sugar. Mix in the vanilla extract and beaten eggs. Combine dry ingredients in a larger bowl, then add dry mixture alternately with mashed bananas and milk. Fold in chopped walnuts with a large spoon or spatula and stir mixture thoroughly. Grease and flour 1 bread pan (2-3 smaller loaf pans) or 18 muffin cups. Allow to batter to sit in pan/s for at least 10 minutes prior to baking. (This will allow banana bread, banana loaves or banana muffins to rise and be moist and fluffy) For banana bread or 2-3 smaller loaves bake at 350 degrees for 45-60 minutes. For 18 banana nut muffins bake at 350 degrees for 20-25 minutes. Use a cake test/toothpick method to see if done when toothpick inserted about half-way in middle comes out clean. Do not over bake or allow to burn. Check oven every 2-3 minutes after lowest time allotted for baking. Allow to cool on a baking rack for at least 15-20 minutes prior to slicing and or serving…Enjoy! Karen’s Tip: Use a large ice cream scoop, half-cup measure or gravy ladle that is at least 1/2 cup to scoop batter into each greased muffin tin. You may line each muffin tin with cupcake paper liners instead of greasing them, but remember not to burn edges or the paper liners will burn and will be difficult to remove. Adjust your oven temperature and baking time accordingly.
0 Comments
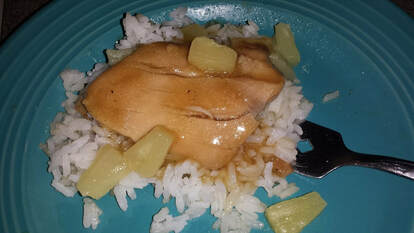
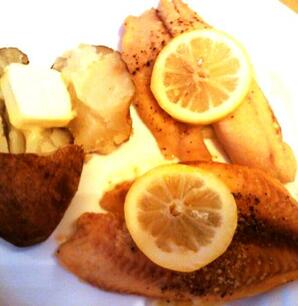
 Servings: 6 2 lbs. boneless, skinless (6) chicken thighs 1/2 tsp. freshly ground black pepper 1/4 tsp. salt 2 tsp. coconut oil Nonstick cooking spray 1 cup pineapple juice 3 Tbsp. raw sugar 2 Tbsp. lower-sodium soy sauce 3 Tbsp. cold water 2 Tbsp. cornstarch 3 cups cooked Jasmine Rice (kept warm) Pineapple tidbits Sprinkle chicken thighs with pepper and salt. Heat a large nonstick skillet over medium-high heat. Add coconut oil to pan; swirl to coat. Add chicken to pan. Cook 2 to 3 minutes on each side or until browned. Transfer chicken to a 4-quart electric slow cooker coated with nonstick cooking spray. Stir pineapple juice into drippings; scraping pan to loosen browned bits. Remove from heat; stir in raw sugar and low-sodium soy sauce. Pour juice mixture over chicken. Cover and cook on LOW for 2 1/2 hours. Transfer cooked chicken thighs to a serving platter with a slotted spoon. Increase heat to HIGH. Combine the 3 tablespoons cold water and 2 tablespoons cornstarch in a small bowl; add to sauce in slow cooker, stirring with a whisk. Cook 2 minutes or until sauce thickens, stirring constantly with whisk. Place 1/2 cup of rice on each of 6 dinner plates. Top rice with chicken thighs and spoon with sauce. Sprinkle each serving with pineapple tidbits and enjoy. Karen’s note: You can also sprinkle on top of each serving a little bit of sliced green onions, a pinch of toasted coconut and/or a few roasted almond slices and enjoy!  My wife is a BIG Fan of Tilapia and an even BIGGER Fan of me doing the cooking on the grill. One of the things that I found out about grilling Tilapia is that you lose most of the flavors that you add to the Tilapia through the grill grate. So, I came up with this idea of putting the Tilapia in a pouch to keep all of the flavors together and it saves time by not really needing to either marinate or brine the Tilapia. Grilling basically steams the Tilapia and infuses all of the great flavors that we like into the fish. You keep the flavors with the Tilapia as it cooks and when you turn the fish over in the pouch you avoid having to scrape the fish off of the grill grates (even if you oil them like I do). When you take that pouch off of the grill and open it, those flavors kick your taste buds into high gear and you are in store for a wonderful Tilapia meal. Here is what you will need to make my Grilled Tilapia in a Pouch: 3 whole Tilapia – cleaned (OR 6 cleaned Tilapia fillets) 1 medium Vidalia or red onion 1 or 2 Large Lemons or Lemon Juice 6 to 8 cloves garlic, crushed Olive Oil Cayenne Pepper Kosher Sea Salt and Fresh Ground Black Pepper 6 aluminum sheets, approximately 14 by 14 inches Heat grill to medium-high heat. Rinse Tilapia and pat dry including the cavity if you’re grilling it whole. Slice onion into six or eight 1/8-inch rings, and set aside. If using a whole Lemon then slice lemon also into six or eight 1/8-inch rings, remove seeds and set aside then squeeze the Juice from the remaining lemons and set that aside as well. Rub Olive Oil generously all over the Tilapia, including a generous amount in the cavity. Rub 1 clove of crushed garlic over the Tilapia and inside the cavity. Place 1 whole Tilapia (or 2 fillets) in the center of the aluminum foil then season the outside and inside (or both sides of the fillets) with Salt and Ground Pepper to taste. A Light sprinkle of Cayenne Pepper will kick it up a notch. Place Onion, a crushed Garlic clove and a couple of Lemon Slices (or Lemon Juice) inside the cavity or between the fillets. Drizzle the outside of the Tilapia generously with remaining Lemon Juice. Fold aluminum foil around fish to create a sealed package. Repeat for each Tilapia. How long you grill the Tilapia will depend on how big the Tilapia or fillets are. Place packets on hot 350 degree grill for 5 to 6 minutes on each side turning the packets over one or two times during the grilling. If using Fillets then only cook for 3 to 4 minutes on each side. Remove fish from foil and serve immediately. Note: To add another dimension of flavor to the Tilapia, place a pat of butter in the cavity before folding in the aluminum foil. |
Karen VerduscoAlways reinventing myself by creating new recipes or craft ideas. All photos are genuine. Please send me an email or recipe you liked or tried. Categories
All
Archives
June 2017
|
-
Products
- Belts >
-
Billfolds, Clutches and Wallets
>
- Leather Clutch / Wallet
- Ostrich Leather Clutch Wallet
- Biker Long Leather Wallet
- Large Leather Billfold
- Slim Credit Card Wallet
- Slim Debit Wallet
- Deluxe Leather Roper Wallet
- Leather Biker Wallet
- Leather Billfolds
- Minimalist Leather Credit Card Wallet
- Deluxe+ Leather Roper Clutch/Wallet
- Leather Roper Wallet
- Bolo Tie
- Book Cover
- Business Card Holders
- Can Koozies with Handles
- Coin Pouches >
- Cosplay Leather Pouches
- Handbags and Purses >
- Java Jackets
- Knife Sheaths >
- Leather Jewelry >
- Luggage Tags
- Motorcycle Leather >
- Phone Holster
- Picture Frames >
- Remote Control Caddy
- Rodeo Buckles
- Strap Handles
- Tool Pouches
- Valet Tray
- Watch Band
- Wedding Guest Book
- Leather Blog
- Recipes

 RSS Feed


