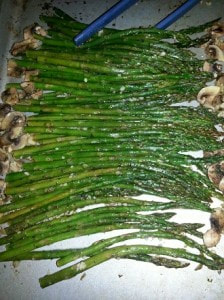
 Asparagus is rich in vitamins A and K and a good source of saponins,
which possess anti-cancer properties and the potential to improve blood pressure. Asparagus also contains a prebiotic called inulin, which promotes a healthy digestive tract. Fresh Asparagus is one of the easiest green vegetables to prepare. It cooks quickly and pairs well with citrus and herbs. Serve this dish with any fish, grilled tilapia or grilled chicken breast. (see recipe links below) 4-5 servings You’ll need: 1 lb. Asparagus, bend to snap tough parts off and rinse thoroughly 4-5 large Monterrey mushrooms, cleaned, stems cut off and sliced 1-1/2 Tbsp. minced garlic 3 Tbsp. extra virgin olive oil 1-1/2 Tbsp. lemon juice 1 Tbsp. parsley flakes 1 Tbsp. poultry seasoning 1/8 tsp. ground sea salt (optional) 1/4 tsp. ground black peppercorns Non-stick olive oil spray Preheat oven to 400 degrees Fahrenheit. Spray a baking sheet with Non-stick olive oil spray. Arrange Asparagus in a single layer in the center of the baking sheet. On the outside of the baking sheet, along the lipped edges, arrange the sliced mushrooms in a single layer. In a small bowl or Pyrex measuring cup, whisk together the garlic, lemon juice, EVOO, parsley and poultry seasoning. Pour the dressing mixture over the sliced mushrooms and asparagus, using a pair of silicone coated tongs, move the stalks around to make sure that each stalk is coated. Then add freshly ground (optional) sea salt and black pepper all around the tops of the asparagus and mushrooms. Bake for 10 minutes. Take out baking sheet and using coated tongs, mix the mushrooms for proper browning. Put back into oven for an additional 2 minutes, or until asparagus is tender and mushrooms are nice and brown. Serving Suggestion: Use the coated tongs to transfer the asparagus to one end of an oblong serving platter and leave tongs on the platter. Put mushrooms and roasted garlic, along with other drippings, into a small serving bowl. Serve the small bowl at the other end of the oblong platter with a regular (un-slotted) serving spoon. Karen’s Note: I enjoy the bright green color and complimentary fresh taste of the asparagus served with fish or grilled chicken. My family loves the garlic roasted mushrooms served right on top of my husband Frank’s Grilled Tilapia in a Pouch or Key West Grilled Chicken Breasts and Pineapple.
0 Comments
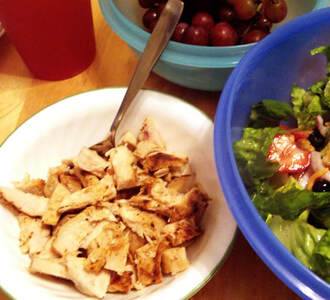 Servings: 3-4
You’ll need: 3-4 boneless, skinless chicken breasts, still frozen 1 12 oz. can beer, room temperature 7-8 peppercorns 3 whole cloves 2 bay leaves 16 oz. salted water, enough to cover the breasts Olive or canola oil Mix all the above ingredients to make the beer brine in a large bowl, enough to hold 32 ounces. Place the still frozen chicken breasts in bowl. Set covered bowl in the fridge overnight to brine. The chicken breasts will fully thaw and brine overnight. Sprinkle both sides of each thawed and beer brine chicken breasts with your favorite rub and set outdoor grill at 300 degrees. Scrape grill grate and wipe with olive or canola oil. Grill breasts, until largest breast is pierced in the middle with a knife and is no longer pink. These grilled chicken breasts will be so moist and delicious! Karen’s Note: Serve immediately with your favorite side dishes or chill in refrigerator for at least 3-4 hours. After chilled slice breasts into halves lengthwise and then dice or cut into strips. They are great to serve cold on top of your favorite salad, with cold pasta or wrapped up in a low fat tortilla. In the cooler fall and spring months I also make Chicken Tortilla, Noodle or Rice Soups that are great with this grilled chicken breast meat! Also, my beer brine to thaw frozen chicken breasts was an accidental quick attempt to get our always frozen chicken thawed and ready to place on the grill. We are always told to thaw chicken in refrigerator or microwave, but the fridge always takes too long and the microwave always starts to cook the meat too soon. Enjoy my wonderful beer brine frozen-grilled chicken breasts recipe for your next outdoor grilling! ~ Karen 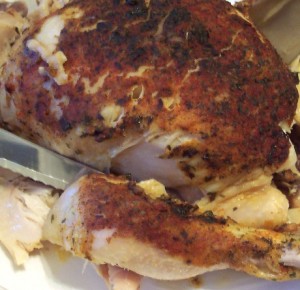 Need a slow cooker recipe for a perfectly cooked chicken?
Well this is it! This chicken is so easy to remove from the bone and the skin just comes right off…an excellent leftover slow-cooked chicken to use for another dish or meal! Servings: 8-10 You’ll need: At least a 3-1/2 qt. slow-cooker Non-stick cooking spray 1.5 – 2 lb. whole chicken, neck or gizzards removed (if any) Buttery spray, Smart Balance brand preferably 2-1/2 tsp. garlic powder 1-1/2 tsp. seasoned salt 1-1/2 tsp. poultry seasoning 1-1/2 tsp. paprika 1-1/2 tsp. onion powder 1-1/2 tsp. parsley flakes 1 tsp. ground black pepper 1 meat thermometer Spray the inside of a slow-cooker crock with non-stick cooking spray. Cut off string (if any) on chicken and remove any excess fat and skin. Place chicken with legs up into slow-cooker crock. Cover entire chicken with buttery spray. Sprinkle seasonings; covering the visible parts of the chicken with the garlic powder, seasoned salt, poultry seasoning, paprika, onion powder, ground black pepper and parsley flakes. Cover and cook on high for at least 3-1/2 to 4-1/2 hours, or until an inserted meat thermometer into the thigh of the chicken reads at least 180 degrees. Turn slow cooker heat to low until ready to serve. Serve immediately; saving any leftover chicken in a sealed container in the fridge. Karen’s Note: To make a chicken gravy from strained chicken drippings just make a flour roux/paste using 1/4 cup all-purpose flour and 2-3 Tbsp. water whisked into a paste in a 2-3 cup measuring bowl. Slowly add the strained (using a strainer to remove any skin, bones, etc.) drippings to the roux and whisk briskly until it is thickened as a gravy…CAUTION DRIPPINGS AND GRAVY WILL BE VERY HOT! Also, the gravy may taste wonderful, but it isn’t low fat, so go easy on the servings! |
Karen VerduscoAlways reinventing myself by creating new recipes or craft ideas. All photos are genuine. Please send me an email or recipe you liked or tried. Categories
All
Archives
June 2017
|
-
Products
- Belts >
-
Billfolds, Clutches and Wallets
>
- Leather Clutch / Wallet
- Ostrich Leather Clutch Wallet
- Biker Long Leather Wallet
- Large Leather Billfold
- Slim Credit Card Wallet
- Slim Debit Wallet
- Deluxe Leather Roper Wallet
- Leather Biker Wallet
- Leather Billfolds
- Minimalist Leather Credit Card Wallet
- Deluxe+ Leather Roper Clutch/Wallet
- Leather Roper Wallet
- Bolo Tie
- Book Cover
- Business Card Holders
- Can Koozies with Handles
- Coin Pouches >
- Cosplay Leather Pouches
- Handbags and Purses >
- Java Jackets
- Knife Sheaths >
- Leather Jewelry >
- Luggage Tags
- Phone Holster
- Picture Frames >
- Remote Control Caddy
- Rodeo Buckles
- Sissy Bar Covers
- Strap Handles
- Tool Pouches
- Valet Tray
- Watch Band
- Wedding Guest Book
- Leather Blog
- Recipes
 RSS Feed