 Servings: 12
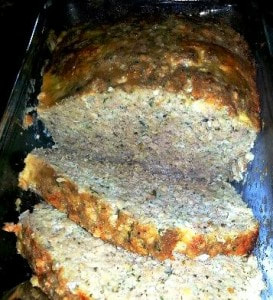
You’ll need: 2 lbs. lean ground turkey 2 large eggs 1 cup quick oats 1 Tbsp. minced garlic 1 Tbsp. chopped basil 1 Tbsp. chopped parsley 1 cup grated Parmesan cheese 1 tsp. salt 1 tsp. pepper 1 Tbsp. olive oil Non-stick cooking spray Preheat oven to 350 degrees. Spray non-stick cooking spray on bottom and sides of a large glass loaf pan. In a large mixing bowl stir or hand mix together, thoroughly, the ground turkey, eggs, quick oats, garlic, basil, parsley, Parmesan cheese, salt and pepper. Press meatloaf mixture down firmly into loaf pan, until meatloaf is completely level. Using a fork, poke holes all around and about the sides and drizzle olive oil evenly over top of meatloaf . The olive oil will drizzle down a bit inside and on the sides of the meatloaf. Bake the Italian Turkey Meatloaf for about one hour*. It should read 165 degrees, when a meat thermometer is inserted in the middle and both sides. The outside will be pulling away (slightly) from the sides and the top will be a golden brown. Remove the finished Italian Meatloaf from the oven and allow to sit and slightly cool for about 15 minutes, before slicing and serving. Serve with any vegetable, salad and/or pasta or potato side dish. Karen’s Note: Aluminum or metal loaf pan is not recommended. Meatloaf, definitely, should be completely cooked in about one hour of baking time. *If your Ground turkey packages total about 2-1/2 lbs., add another large egg, an additional 1/2 cup of quick oats, 1-1/2 tsp. more each of the chopped basil and parsley and possibly an additional 15-20 minutes more baking time, depending on your oven. It is recommended that a meat thermometer is inserted in the center, but not completely to the bottom of the pan, and that it reads at least 165 degrees for cooked poultry.
0 Comments
 Servings: 3 (Note: This sandwich recipe can be doubled if necessary.)
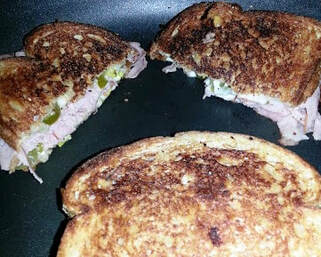
You’ll need: 6 slices of Multi-grain Bread 6 slices of 2% Milk Monterrey Jack or Pepper-jack Cheese Sliced Dill Pickles or Slices of Tamed Jalapenos (drained) 95% Lean Deli Sliced Smoked Ham or Turkey (about 6-12 ozs.) 12 sprays (per 1 side of each slice of bread) of I Can’t Believe It’s Not Butter! Extra Virgin Olive Oil – Spray 2 Tbsp Extra Virgin Olive Oil (optional for non-stick and added browning) 12 thin slices of Avocado (optional) Heat a non-stick flat griddle, a large non-stick skillet or non-stick Panini maker to medium-high heat. Add two slices of multi-grain bread. Spray each side of bread with the I Can’t Believe It’s Not Butter EVOO spray and using a silicone brush spread about 1 tsp. of (optional) Extra Virgin Olive Oil on the side of bread slice that is facing up. Next, turn over slices of bread in 1-2 minutes, which is about the time it takes to add the non-butter EVOO spray and (optional) Extra Virgin Olive Oil. Add 1 slice of 2% milk cheese slice to each heated side of bread. Layer each bread slice with up to 6 pickles or jalapenos in the center of cheese slice. Then add 1-2 ounces of lean smoked ham or turkey. Carefully flip one side of sandwich on top of the other side. Press down firmly with a wide cooking spatula, making sure that the bread is browning evenly. If the heat is too high, turn it down to medium. If the bread is not turning a caramelized brown, then turn heat up to almost high, but turning the heat down is usually the case here. The cheese should be melting, but not “burning”. Lift up slightly to see if the bottom is browned…about 2-3 minutes and flip to brown the other side of the Grilled Cheese Sandwich, making sure to press down firmly. This helps the cheese melt into the sandwich and keep the pickles or jalapenos inside the melted Grilled Cheese Sandwich. Serve as a full Grilled Cheese Sandwich or cut in half or quartered on a dinner plate. A side of kettle chips, or sliced raw or steamed veggies is a nice touch. Perhaps serve with (optional) sliced Avocados, tooth-picked to the top of each half or quarter of the Grilled Cheese Sandwich, but any creamy, hot cup or any small bowl of soup on the side, which is really enjoyed during the chilly winter and early spring months and always goes good with this Grilled Cheese Sandwich…Enjoy! ~ Karen Verdusco Karen’s Note: This is not a low fat or low sodium recipe, but I’ve lowered the “bad fats” – by using 2% milk cheese slices and omitting the butter and lowered the sodium, as well, to give the Sandwich Maker the option to increase the Omega 3’s – “good fats” – by adding the EVOO non-buttery spray, Extra Virgin Olive Oil and Avocado Slices to this recipe. I consider any switch of sodium and “bad fats” to be included in my Heart Healthy Cooking and Eating Tips. 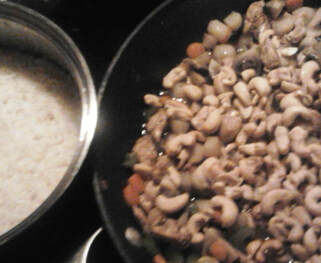 Servings: 4-6
2 Tbsp. canola oil or canola/olive oil blend 1/4 small onion, diced 2 tsp. minced garlic 1/2 tsp. salt 1/2 tsp. ground black pepper 1 – 1-1/2 lbs. uncooked boneless, skinless chicken breast, trimmed of visible fat, cut into 1 inch cubes 1-1/2 cups low sodium chicken or vegetable broth 2-1/2 Tbsp. low sodium soy sauce 2 celery stalks, chopped or diced 1 cup baby carrots, sliced or diced 8 oz. can water chestnuts, drained, sliced or diced 1 cup white button mushrooms, quartered 1-1/2 Tbsp. cornstarch 1-1/2 cups white rice, cooked according to package and kept warm 4-6 oz. unsalted whole or halved cashews Heat oil in a large skillet or wok over medium-high heat. Add onions and garlic and cook, while stirring for approximately 1-2 minutes. Season chicken with 1/2 Tbsp. soy sauce, salt and pepper and add to the skillet or wok. Cook until brown on all sides, while stirring for about 3-4 minutes. Stir in 1 cup of broth, remainder of soy sauce, celery, carrots and water chestnuts and bring to a simmer. Reduce heat to low, cover and simmer, until chicken is cooked thoroughly for about 4-5 minutes. Dissolve cornstarch in remaining 1/2 cup of broth. Add cornstarch mixture to skillet or wok and simmer, uncovered, stirring continuously for about 1-2 minutes, until sauce thickens. Turn heat to warm or cover with lid, until ready to serve. To Serve: Remove skillet from heat. Divide cooked rice among 4-6 shallow dishes or bowls. Spoon 1/4 or 1/6 of chicken stir fry mixture over rice and sprinkle with 1/4 or 1/6 of the cashews. Serve Cashew Chicken with optional chopsticks and enjoy! Karen’s Note: For over 9 years my family has been enjoying this wonderful Cashew Chicken Chinese Stir Fry. After posting a picture of this on my facebook profile page, while making it for our dinner last night a friend of mine asked if I could share this recipe. I am glad to finally be able to share it with all of you. Usually it is “gobbled up” within minutes, before I can take a picture. However, right now it’s just me and my hubby as my 19 year old son is currently away at Army Basic “Boot” Camp. Have fun cooking! :) |
Karen VerduscoAlways reinventing myself by creating new recipes or craft ideas. All photos are genuine. Please send me an email or recipe you liked or tried. Categories
All
Archives
June 2017
|
-
Products
- Belts >
-
Billfolds, Clutches and Wallets
>
- Leather Clutch / Wallet
- Ostrich Leather Clutch Wallet
- Biker Long Leather Wallet
- Large Leather Billfold
- Slim Credit Card Wallet
- Slim Debit Wallet
- Deluxe Leather Roper Wallet
- Leather Biker Wallet
- Leather Billfolds
- Minimalist Leather Credit Card Wallet
- Deluxe+ Leather Roper Clutch/Wallet
- Leather Roper Wallet
- Bolo Tie
- Book Cover
- Business Card Holders
- Can Koozies with Handles
- Coin Pouches >
- Cosplay Leather Pouches
- Handbags and Purses >
- Java Jackets
- Knife Sheaths >
- Leather Jewelry >
- Luggage Tags
- Phone Holster
- Picture Frames >
- Remote Control Caddy
- Rodeo Buckles
- Sissy Bar Covers
- Strap Handles
- Tool Pouches
- Valet Tray
- Watch Band
- Wedding Guest Book
- Leather Blog
- Recipes
 RSS Feed